 Admin Setup – SEL/Status Check
 How It Works – SEL/Status Check
Basic
The PBIS Rewards SEL/Status Check feature allows staff members or students to check and track the ready-to-learn state of students in order to help students recognize and manage their emotions.
SEL/Status Check from the Web Portal
SEL/Status Check from the Staff App
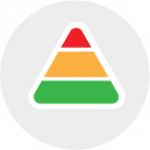
SEL/Status Check from the Web Portal:
A staff member can view and record SEL/Status Checks for the students that they have in a group/class.
- Navigate to a group.
- Select all students or individual students.
- Press the “SEL/Status Check” button and choose to view SEL/Status checks or to submit SEL/Status checks.
- If you choose to view SEL/Status checks you can see some details concerning the students selected.
- Use the arrows next to the column name to sort the data.
- Select the student’s name to see all of that student’s SEL/Status Checks from the student dashboard, if the appropriate permissions are activated.
- Click the “SEL/Status Guide” button to view/print the SEL/Status Check definitions.
- The “Check Now” button will allow staff to submit a SEL/Status Check for that student.
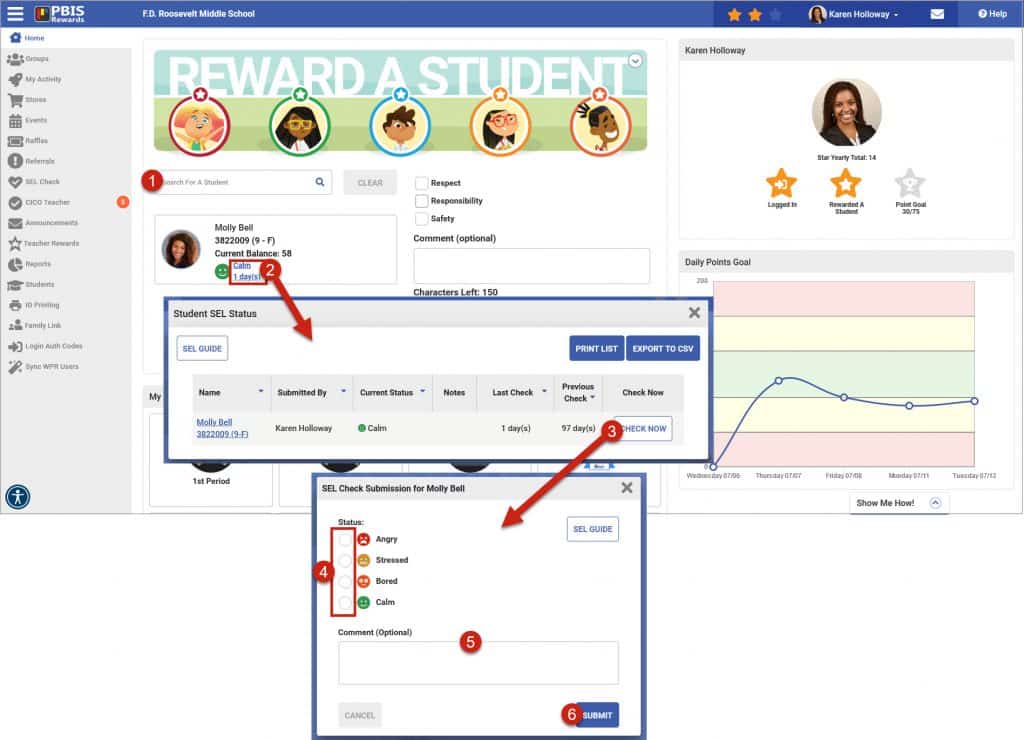
A staff member can record an SEL/Status check for any student in the school from the “Home” page.
- Search for and select a student.
- From the student card, select the current blue highlighted SEL/Status record.
- On the view screen, press the “Check Now” button to submit a SEL/Status Check.
- From the SEL/Status Check Submissions window, choose the appropriate status based on a conversation with the student.
- Enter a comment if applicable.
- Use the “Submit” button to finalize the SEL/Status Check.
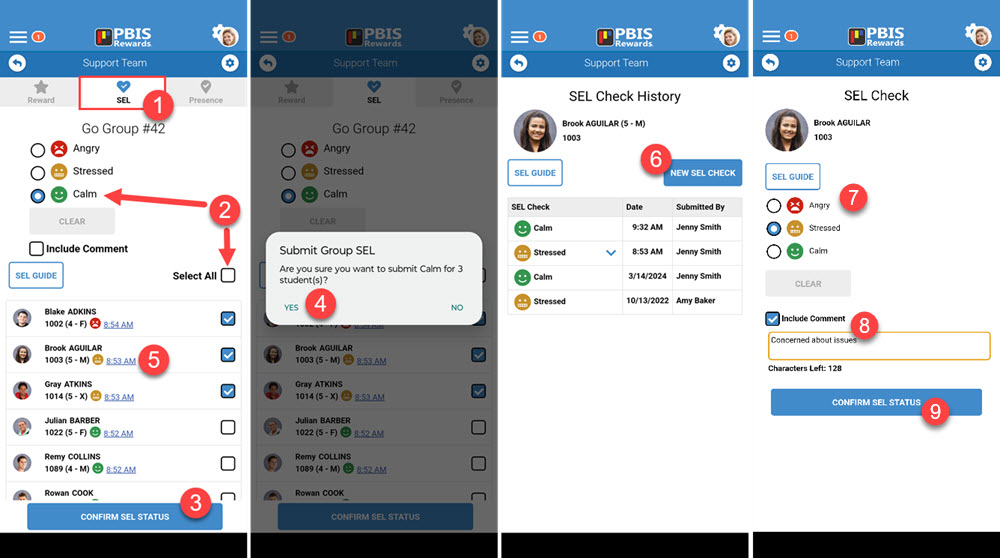
SEL/Status Check from the Staff App:
Staff members can see their student’s last SEL/Status Check and submit a status directly from the groups page of the staff app.
- Select the SEL/Status tab in a group
- Select the disposition for the new check and the applicable students
- Select “Confirm SEL Status”
- Submit the Group SEL by choosing “Yes”
- Select the emoji or blue link to open up the view status page on a particular student
- On the view status page you can see past SEL/Status Checks or view the SEL/Status Check Guide. Press the “New SEL Check” button to set a new SEL/ Status Check
- Choose the appropriate status
- Add a comment if applicable
- Select the “Confirm Status” button to finalize the status